Archive

Continuing Peel Away Process on Fireplace

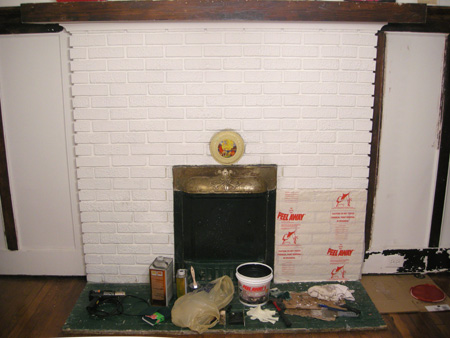
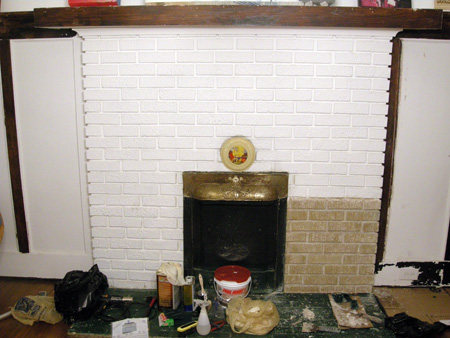
Our fireplace paint removal with Peel Away has continued over the last week. In order not to get overwhelmed we are tackling one little section at a time. Patrick is applying the Peel Away…

Applying Peel Away

The waxy paper is applied. Now we wait…

Fireplace with Peel Away

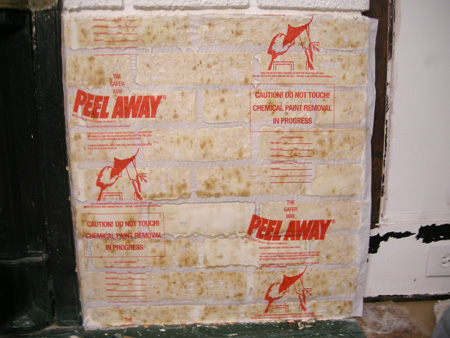
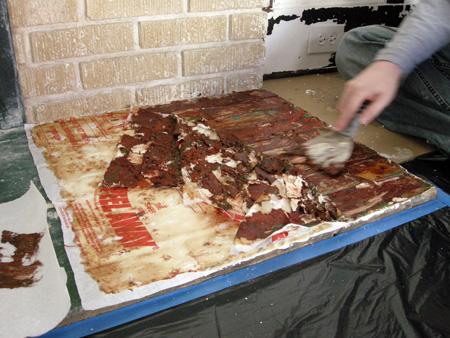
As the hours pass it seems as though the paint color tries to escape towards the waxy paper. It’s interesting to note the two bricks we’ve previously already removed paint from have less of the colored blotches…

Fireplace with Peel Away close-up

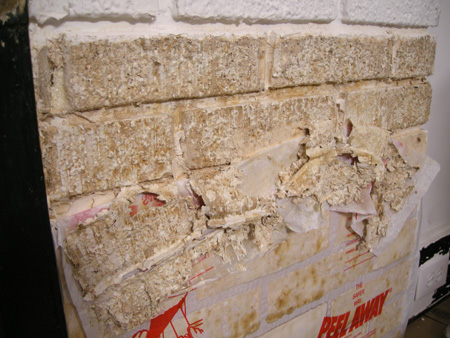
With metal scrapers we try to peel away the paint with the paper as best as we can. Since this brick is so extremely textured a good amount remains behind in the gaps.

Removing Peel Away

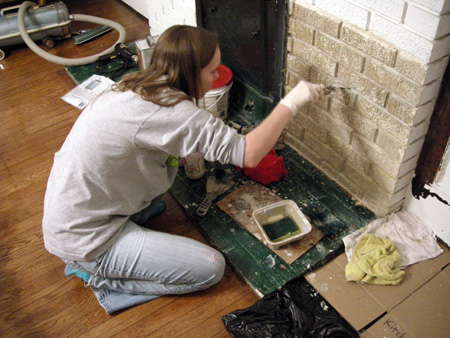
We try to wash off the excess paint and chemical as best as we can with a sponge, nylon brush, towels, and lots of water changes. After that I tackled the brick with a metal scraper to get off areas that are softened because of the water but sticking too much for the sponge.

Removing Peel Away

Our first block complete! Can’t you picture the whole beauty already?

Removing Peel Away

Next we decided we wanted to figure out what surprise lay ahead of us for the fireplace hearth. After the overnight waiting period we started to remove the multi-colored mess.

Removing Peel Away

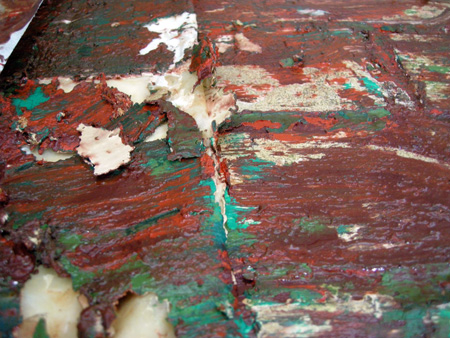
I had to take a close-up of the color mess. Will you look at those colors?! Obviously we knew the top coat of paint was a dark green, but underneath that was a BRIGHT red paint. It may be a little hard to tell in the photo because the bright red is already mixed in quite a bit with the other colors, but believe me, it was quite red. I think many home restorers will have stories about the colors they find when digging through the layers of paint. We’ve had our share of pastel pink and pastel green in the bathroom, and a pastel yellow in the kitchen. All those appeared to be older colors. Then we found a bright blue in our bedroom, and now this neon red in the dining room – my guess is 70s? I seem to get this picture that our house used to be bright circus colors!

Smeared Peel Away paint

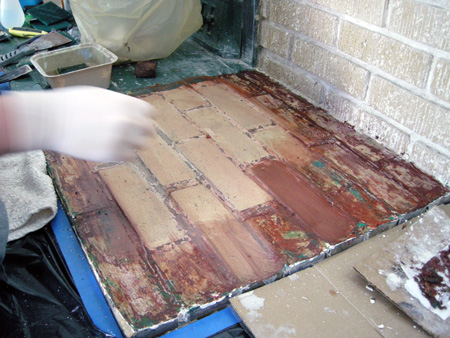
After some sponge washing the tan tile is starting to appear.

Cleaning off Peel Away

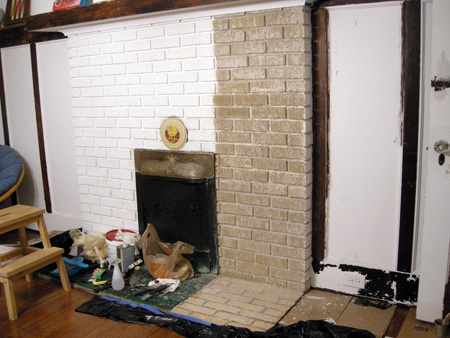
And here is where we’re at after four Peel Away sections. I’m loving it already!!

Partially removed paint

Posted in Our Bungalow, Photos, Westview Bungalow | Tagged , , , , , , , , , , , | Comments Off on Continuing Peel Away Process on Fireplace

Fireplace Paint Removal with Peel Away

Our socially uneventful weekend proved itself to be very helpful in the house project department. Patrick has been eager to remove some paint from the dining room fireplace – initially to my dismay because it would mean another started project while the old ones sit unfinished. I made him start on a lower brick so it could be hidden by our plants if it should become one of our many unfinished projects. While Patrick equipped himself with our regular Kleanstrip chemical paint remover I decided to tackle the painted crystal doorknobs. (Patrick had pulled them out on one occasion and then they laid there untouched for weeks before we had to tuck them back away for a party.)

My Friday and Saturday nights were pretty successful with the paint removal on the doorknobs. I applied the chemical first, removing the paint as best as I could, then I put some Goo Gone gel on a paper towel and wiped any remaining paint off. Previously I actually only removed the paint with the Goo Gone, but this time I decided to try it this way. Then I polished the brass parts with steel wool. (The brass on the right was polished, the brass on the left still needs to be polished.)
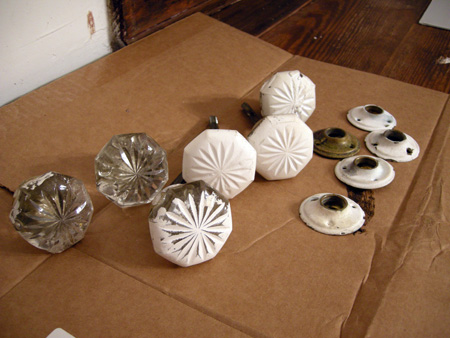
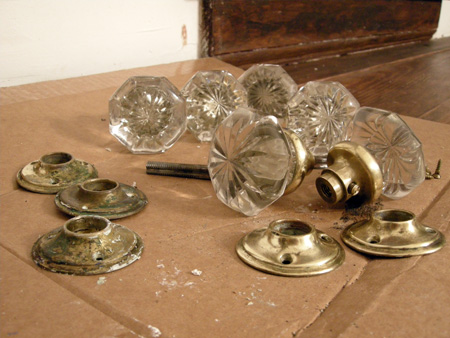
Painted glass door knobs

Door knob paint removal

Patrick’s Friday and Saturday nights on the other hand were a little more frustrating. After seemingly endless applications of the chemical followed by removal with a nylon brush it felt like relatively little progress was achieved. After the first chemical application the white paint on the brick got into the fresh chemical in the cup, so every time a new layer of chemical was applied it just felt like a new layer of white paint was reapplied to the brick via the chemical. As a result we had a hard time figuring out when we had actually reached the brick and what color it was supposed to be. So after two nights we think we got close to reaching the brick…
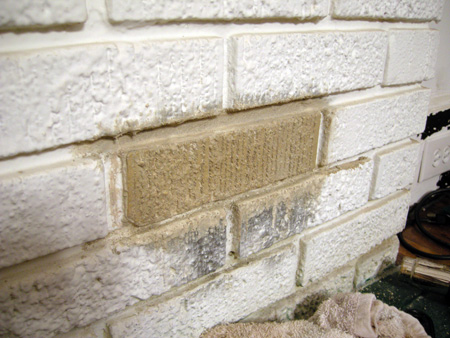
Peel Away trial

…but we also realized we’d be pulling out each other’s hair if it would take us this long for each brick.

In our paint removal quests we have often come across websites talking about Peel Away. The reviews always seemed mixed. Some people got great results, others were less than happy. Since we’ve been pretty happy with the results from the Kleanstrip we didn’t feel the need to go out of our way to search for Peel Away, but at this point in the brick paint removal process we revisited the idea. So on Sunday we found that Sherwin Williams stores sell it and picked up the last bucket they had. (I don’t know if that means the product is flying off the shelves or we’re the first people that bought it?) Pretty much everything you need is contained in the bucket – the goo, a pair of gloves, the applicator, and the waxy paper to cover the goo with. The one thing that was not supplied but the directions recommended was to use a nylon brush to get into detail areas. Of course we didn’t read this until after we got back home, so it didn’t do us any good.
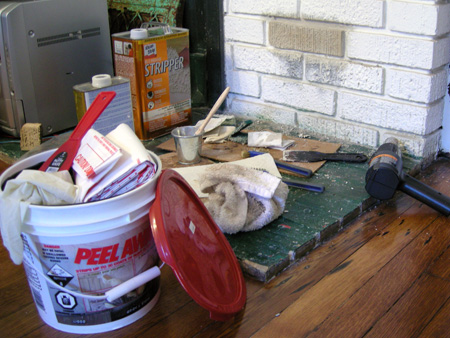
Peel Away supplies

The directions recommended to do a test area (as always!), which unfortunately meant up to a 24 hour waiting period! We had to force ourselves to be patient and obey, so Patrick applied the fun looking Coolwhip goo to one brick with the applicator.
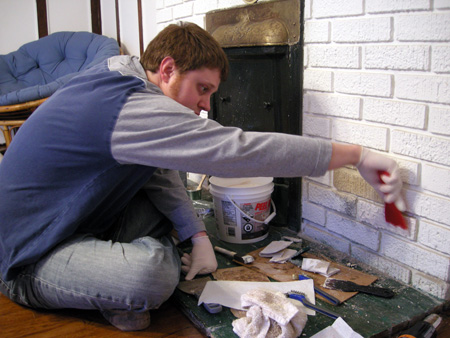
Peel Away paint removal

Then the waxy paper was applied over it.
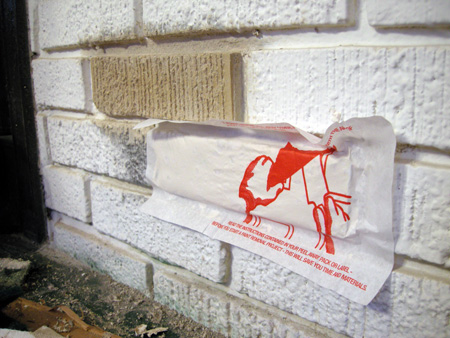
Peel Away paint removal

The instructions said the Peel Away can be removed after 12 to 24 hours and you’ll know when the goo feels like workable clay. After 20 hours it felt right, so we started to take it off with a metal scraper.
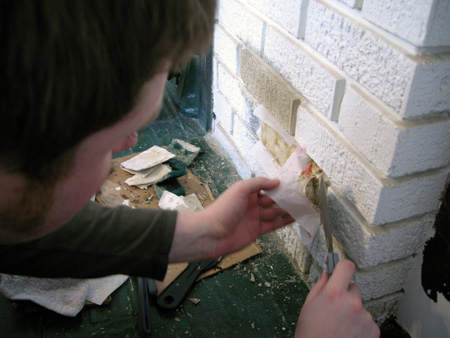
Peel Away paint removal

After scraping away remaining residue with the metal scraper as best as possible we used a wet nylon brush to get additional paint out of the creases. We then used a wet sponge to wash off the paint and patted it dry with a towel. We also put a towel on the ground to catch all the wet sponge runoff. Then we repeated this process a number of times.
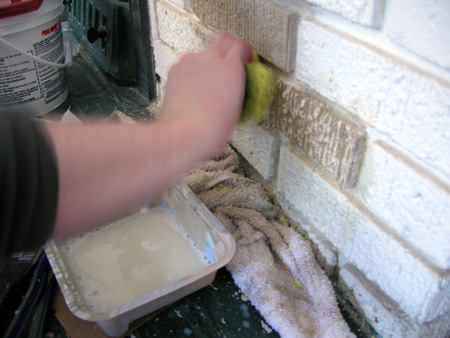
Peel Away scrubbing

Here is the result of our test Peel Away brick! The top one is the two day Kleanstrip chemical brick, but while it looks nice in the photo it was still covered in tan paint. The bottom one is the Peel Away brick. We were pretty pleased with the results considering the time and effort involved compared to the other one.
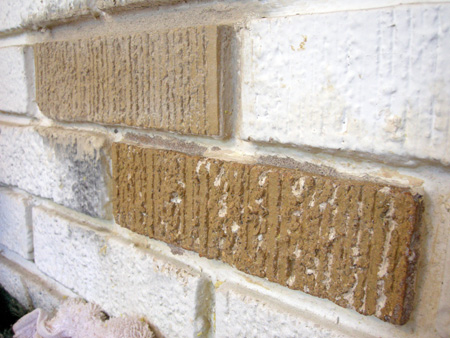
Brick after Peel Away

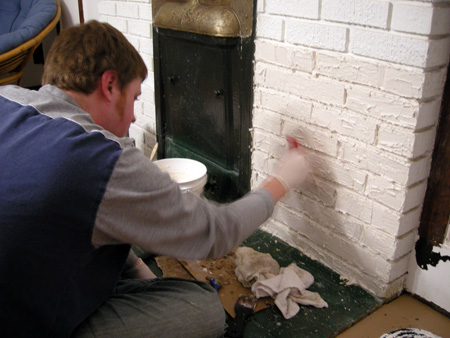
So now we’re ready to tackle a larger area!
Posted in Our Bungalow, Photos, Westview Bungalow | Tagged , , , , , , , , , , , , , | Comments Off on Fireplace Paint Removal with Peel Away

Happy Thanksgiving!

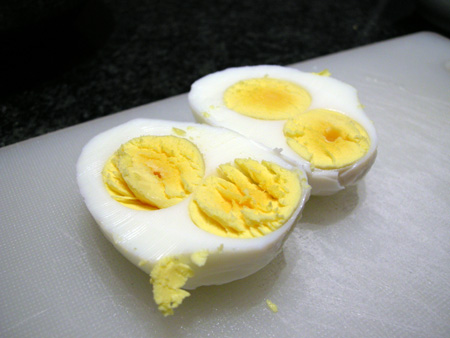
This is totally unrelated to house stuff, but Patrick and I were preparing deviled eggs for Thanksgiving dinner and came across a “twin egg”!! Never seen that before. So…somehow that means HAPPY THANKSGIVING! I hope everyone was able to spend some quality fun time with loved ones over yummy food!

Thankgiving twin egg

P.S. Nolan, if you’re reading this, I think this egg is dedicated to you! :)

Posted in General | Tagged , , , , , | Comments Off on Happy Thanksgiving!

Neighbor Stories

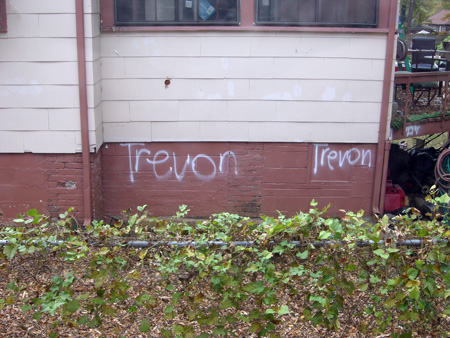
I’m sure everyone has their stories about neighbors. I know we have our fair share – I think one day I’ll have to publish my book “Diary of a Mad White Woman,”€ haha. Anyway, the other morning we woke up and opened the blinds only to find our neighbor’€™s boy had tagged his grandparents house, shed, lawnmower, herbie curbie – the list goes on. We were like “Ohhhhh shit, someone’€™s going to get in sooooo much trouble!” There was no denying it either since he wrote his name. Patrick joked that even he was smart enough to write his sister’€™s name on the wall when he was doing this stuff as a kid. ;-) (He said the handwriting still gave him away, oops.) Since the neighbors don’€™t always come walk on that side of the house we gave them a warning when we saw them (hey, they were going to see it sooner or later anyway, right?). Needless to say, once he got home from school that afternoon he spent the rest of the day scrubbing away his ““art work.”” Hey, maybe he’€™ll be the next big graffiti artist, right?

Graffiti tagged house

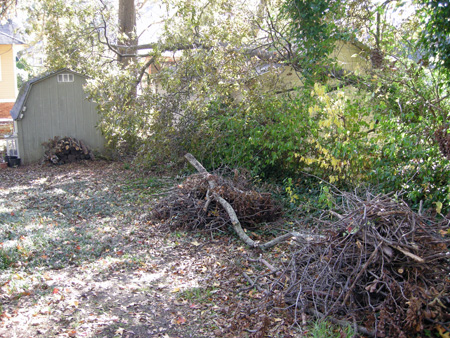
Speaking of neighbors. Some nights ago Patrick and I had just gone to bed. Patrick was already more asleep than me, but I was also half dozed off when I heard a noise that woke me up. Then I heard another noise – kind of like a ““crack””. I asked Patrick “€œDid you year that?”€ He hadn’€™t because he was asleep, but now I had woken him up. It wasn’t that old house shifting kind of creaking that I’€™m used to. This was different. We both listened if there’€™d be another noise. Next thing we know we hear this giant crashing sound. I think we both just about leapt out of bed! We had no idea what it was – did our neighbor’€™s house just collapse?! We peaked out the window. Nothing. Patrick put on some shoes and walked outside around the side of the house. Nothing. So we went back to bed joking that maybe we were hallucinating. (Sniffing too much of that chemical paint remover? Haha.) The next morning we woke up and saw our “hallucination” – a tree had fallen on our neighbors shed! Eek! There are two trees (one of them made up of two large limbs) that were leaning towards ours/our neighbor’s sheds. We had been fearing that one of them could possibly fall on our shed (especially since a rather large limb had fallen from it when we first bought the house), but interestingly enough this was the other tree that had lost its twin limb. A good portion had even made it to our side and was leaning on our shed, though thankfully (for us) the neighbor’€™s shed had broken the fall. We’€™ve been so busy we weren’t sure when we were going to get to removing it from our shed, so we were excited when the neighbors knocked on the door this morning to ask if they could come in our yard to remove it. *phew* Relief!

Tree on fence

Not sure how well you can tell from the photo where the tree fell…hopefully you get the picture. Oh, and those other piles are not related to this case. We’re just stock piling our wood droppings, haha.

Posted in Our Neighborhood, Photos | Tagged , , , , , , , , | Comments Off on Neighbor Stories

Miscellaneous Outstanding Projects

Every homeowner will know these projects- the miscellaneous projects that aren’t big or too difficult, but there’s about a million of them and you just need to 1) remember that the project is outstanding, and 2) have the time and energy to take the 5-10 minutes to carry them out. They’re small enough where they don’t really interfere with your everyday life, but just annoying enough to get annoyed about.

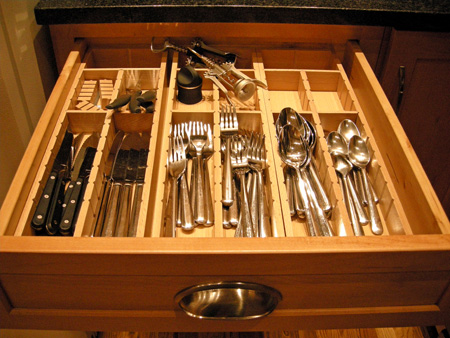
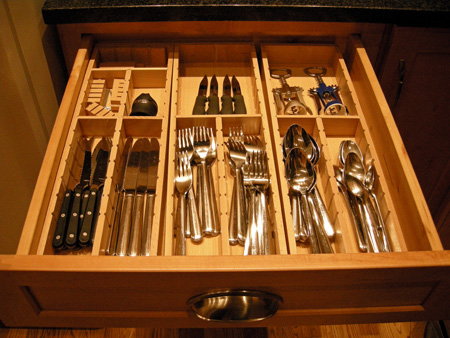
Well we finally tackled one of these miscellaneous mini-projects – the drawer dividers! Back when we were looking for them it took us a minute to find suitable drawer dividers that would fit the size of our drawer. There were some that were plastic and could be extended to whatever size the drawer was, but we weren’t too crazy about those. Leave it up to Ikea to get what you need – we spotted some decent ones that happened to match our drawer color pretty closely. And when combining three of them they filled the drawer space pretty well. Only when we got them we couldn’t be bothered to cut the dividers to match our needs…so ever since we got them however many months (years?) ago the cutlery compartments looked fine, but the back space was totally wasted and the extra items we had in the drawer were sticking up and got caught just about every time you opened it. Well they will not get stuck any more! We took the 5 minutes to cut the divider into a better size and voila everything is great.

Yay for miscellaneous annoying project getting completed.

Before:

Cutlery organization

After:

Cutlery organization

Posted in Our Bungalow, Photos | Tagged , , , , , , , , | Comments Off on Miscellaneous Outstanding Projects