Fireplace Paint Removal Update
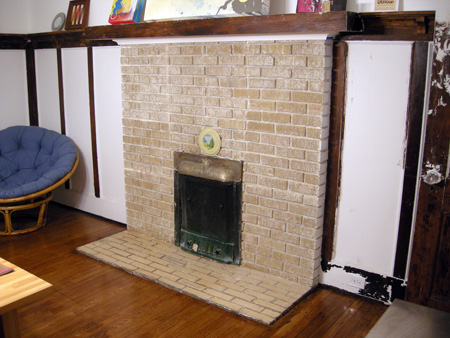
Comments Off on Fireplace Paint Removal UpdateWe finished paint removal with PeelAway on the brick and tile of the fireplace last night. Well, or at least the front. I suppose we didnt do the thin strip on each side.
So this is the result we got after using the PeelAway one time. You can tell how we did it in sections because the PeelAway hardened more at the edges. You can also tell we were in a hurry in the top left corner! We removed it, but had to leave to go to a BeltLine meeting and werent able to do our usual thorough cleaning. As we progressed with each section we tried various methods of after-PeelAway-cleaning. Initially we used the sponge method and lots of towels and switching out water. Towards the end we used a spray bottle and a dust pan to catch the drippings. Then wed use a little nylon brush to rub off the remains in the cracks as best as possible, as well as our metal scrapers to get things out of the cracks.
Using the PeelAway on the extremely textured brick versus on the flat tile was definitely a different experience. The texture takes a lot of work because there are just so many places the paint is able to stick to. The flat surface was really rather quick. The paint never truly peels away like the product title seems to indicate. If you think you can remove the waxy paper with your pinky and all the paint will just magically stick to it and be gone then well perhaps you should either not remove the paint, or hire someone to do the work for you. This will definitely still require some scrubbing and cleaning and work, but I think it helped a lot and we were probably able to cover a larger area quicker than we would have with the KleanStrip. Obviously the more textured the area, the harder the work will be. So overall were very happy with the results from the PeelAway.
Result after one-time PeelAway use:

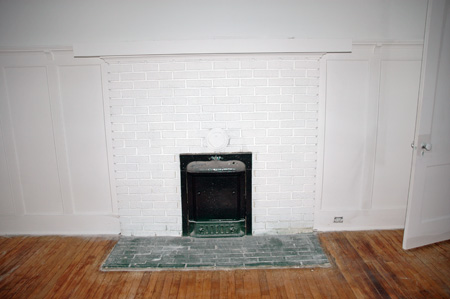
The fireplace when we bought the house (where someone had gone white-paint-happy, and before we refinished the floors):

Thankfully my sister is coming in town for a visit today, so it will give our fingers time to recuperate and will give our mind some time off because otherwise we may have started getting burned out on the project. (There are only so many days in a row you can work on the same thing before you get worn out and need a break.)
So the next steps will be to apply the PeelAway on the metal cover. We have worked on it with KleanStrip on a previous occasion, so we already know it should be a brass cover. Were curious though if we will uncover any additional details! (We’ll show what we’ve uncovered this far when we work on it some more.) Then we have to also remove the paint from the brick on each side of the fireplace. Lastly well probably use KleanStrip to go back and try to remove some of the leftover paint, like where the seams show, or where we ran out of time to properly clean the area. But were really excited about how good this looks already!

Comments are closed